If you've noticed a loose buckle on your shoes or sandals, you're not alone in facing this common issue. It's important to determine whether tightening the buckle will suffice or if a replacement is necessary. You'll need some basic tools to get started, but knowing how to assess the problem effectively can save you time and frustration. Once you understand the steps involved, you'll find it's easier than you might think to restore functionality. The next part involves a few techniques that can guarantee your repair lasts—let's explore those options.
Understanding Buckle Problems
When you notice a loose buckle on your shoes or sandals, it's often a sign of wear and tear that's accumulated over time. You've probably stomped around in those kicks more than you realize! One of the buckles might be hanging on by a thread, and it's time to figure out what's going on.
Loose buckles usually stem from frequent use and, let's be honest, life can be tough on footwear. Sometimes, it's the buckle itself that's broken, while other times, it could be the strap that's lost its grip. You might think about heading to a local cobbler, but there's a catch – many don't always have the right size or color. You end up with mismatched buckles that can ruin the whole vibe of your favorite sandals.
Essential Tools for Repair
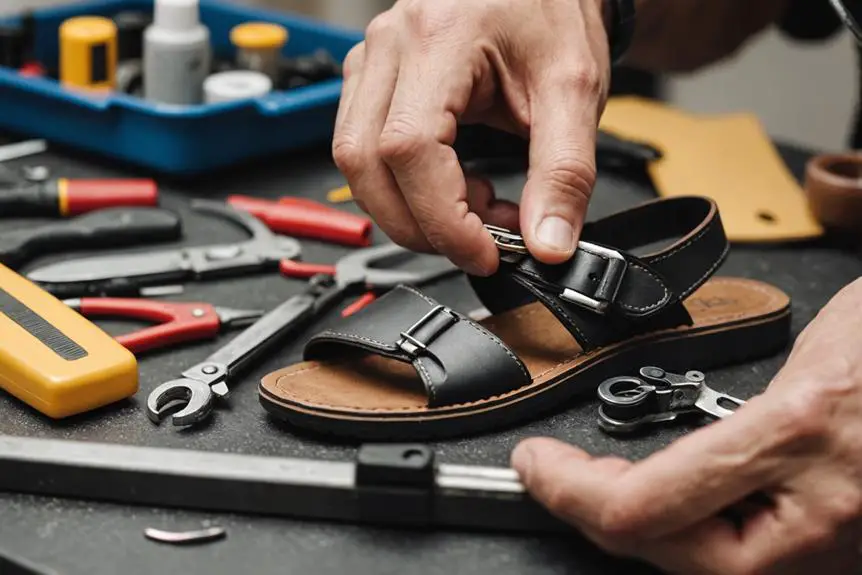
To tackle a loose buckle repair effectively, you'll need a few essential tools that make the process straightforward. You might wonder what exactly you'll need, so let's break it down. First, a seam ripper is your best friend for carefully opening seams without ruining your footwear. You don't want to go all Hulk on your favorite pair, right?
Next, grab some waxed thread for stitching. It's durable and resists fraying, which is especially important when you're dealing with different buckle materials. You'll want that new buckle to stay secure! A curved needle is super helpful too; it makes getting into tight spots a breeze, letting you work on those tricky stitching patterns with ease.
Here's a quick reference table to keep you sorted:
| Tool | Purpose | Repair Aesthetics |
|---|---|---|
| Seam Ripper | Open seams without damage | Maintains the look of your footwear |
| Waxed Thread | Durable stitching | guarantees a neat finish |
| Curved Needle | Access tight areas | Smooth stitching for a polished look |
| New Buckle | Replace the loose or broken buckle | Matches style and size of your footwear |
With these tools in hand, you're all set to restore your shoes or sandals! Remember, basic sewing skills are a must. But don't sweat it too much; you'll be a buckle-fixing pro in no time!
Steps to Fix Shoe Buckles
Before you get started on fixing that loose buckle, take a moment to assess the damage—can it be tightened up, or is it time for a replacement? Once you know what you're dealing with, gather your tools and get ready to tackle the repair steps; it's easier than you might think! Trust me, with a little effort, you'll have those shoes or sandals feeling secure and comfy in no time.
Assess Damage First
It's important to start by carefully examining the buckle to identify whether it's simply loose or if there's more damage that needs addressing. Look closely at the stitching and the leather quality assessment. Is the stitching coming undone? Has the leather loop stretched out? These factors can lead to buckle alignment issues, making your shoes or sandals less secure.
Check for any wear on the buckle itself. If it looks misshapen or worn down from constant use, you might need to contemplate replacement options instead of repair.
Here's a quick overview of what you should assess:
| Damage Type | Action Required |
|---|---|
| Loose Buckle | Tighten screws or reattach |
| Broken Hinge | Replace the hinge |
| Missing Parts | Find and replace missing components |
| Stretched Leather Loop | Sew or replace the leather loop |
| Worn Buckle | Consider getting a new buckle |
Gather Necessary Tools
Repairing a loose buckle requires careful preparation, and gathering the right tools is essential for success. First, you'll need to find a new buckle that matches the original in size and style. Sourcing one from independent craftspeople can add a nice touch to your design aesthetics. Next, grab some waxed thread for durable stitching; it'll hold everything together nicely. A seam ripper is your best friend for opening existing seams without damaging the buckle materials.
While you're at it, don't forget a curved needle! It'll make your life easier when you're trying to sew in those tricky spots. Now, if you've got some basic sewing skills, you're already ahead of the game. A sturdy surface to work on is vital; it'll give you the control you need while handling the materials.
Oh, and consider having some pliers handy! They'll help with tightening knots and securing components during your repair. With these tools in hand, you're well on your way to fixing that buckle like a pro. Ready to plunge into the next steps? Let's do this!
Execute Repair Steps
Now that you've gathered all the necessary tools, you can start executing the repair steps for your loose buckle. First, grab your seam ripper and carefully open the seam holding the leather loop for the buckle. Be gentle; you don't want to ruin the surrounding material! Next, attach the new buckle, paying attention to buckle orientation. Align it properly with the existing stitch holes to keep a seamless look.
Using a curved needle and waxed thread, stitch the buckle in place. Start slightly before the original seam and cover those existing stitches for extra durability. Remember, seam integrity is key! Once you're done stitching, tie off the thread securely within the leather layers. You don't want any knots poking out, trust me; comfort is a must when you wear those shoes or sandals!
Techniques for Strong Stitching
When you're stitching up that loose buckle, you want to make sure it's as strong as a superhero, right? Start your stitches just before the original seam, and don't forget to cover those old holes with new thread for a seamless look. Plus, tying off securely within the leather layers will keep those pesky knots from poking you, making your repair not just tough, but comfy too!
Stitching Durability Enhancement
To enhance the durability of your stitching, start by stitching slightly before the original seam, which reinforces the buckle attachment point. This small change can make a big difference! You'll also want to cover existing stitches during the repair, boosting the strength and longevity of your work. Double back over your stitches for an even stronger bond. Trust me, this helps prevent seam failure when you're putting some serious wear and tear on those sandals!
When it comes to needle selection, a curved needle is your best friend for getting into those tricky spots. It'll make your life easier and your stitches more consistent. And don't forget to tie off those threads securely within the leather layers. No one wants knots sticking out, right? They can lead to discomfort and a failed repair.
Here's a quick reference table for you:
| Technique | Purpose | Tips |
|---|---|---|
| Start Before Original | Reinforces buckle attachment | Prevents seam failure |
| Cover Existing Stitches | Strengthens new stitching | Improves durability |
| Double Back Over Stitches | Creates a stronger bond | Essential for longevity |
| Use Curved Needle | Easier access in tight spaces | Consistent stitching |
| Tie Off Securely | Avoids protruding knots | Enhances comfort |
Knot Security Techniques
Securing knots is essential for ensuring your buckle repairs hold up against everyday wear. You don't want your hard work to unravel, right? So, let's talk about knot security techniques that make a difference! To keep your knots tight and reliable, consider using these strategies:
- Try knot variations: A square knot or double knot works wonders and is less likely to slip than standard knots.
- Use the right knot materials: Strong threads or cords provide the durability you need for those pesky buckle repairs.
- Apply tension: Pull tightly as you tie to create a snug hold that won't budge over time.
- Test your knots: Give them a little tug before you hit the road, ensuring they can handle everyday wear and tear.
Sandal Buckle Repair Process
Repairing a loose buckle on your sandals can restore both functionality and comfort, guaranteeing you get the most out of your footwear. Don't let that pesky buckle ruin your summer vibes! First, assess the damage and locate the broken buckle. Are you ready? Gather your materials—buttons and string will be your best friends in this repair process.
Start by threading the string through one button, then through the sandal's strap. Once you've done that, secure the second button at the other end of the string. This will create a firm fastening. Now, here's the secret sauce: tie at least three secure knots. Trust me, no one wants a buckle that loosens mid-stride!
For balance, make sure those buttons are placed diametrically opposite each other. This way, your sandals won't look wonky! If you're feeling extra adventurous, consider using adhesive for added strength. It's like giving your repair a superhero cape!
Once your masterpiece is complete, it's time for the integrity test. Gently pull on that buckle to verify it can withstand normal use—because no one wants a surprise trip to the ground! With a little effort, you'll have those sandals good as new, ready for all your summer adventures. Remember, whether you're dealing with metal or plastic buckle types, this repair process is a fantastic alternative to tossing those sandals aside. So, roll up your sleeves and get fixing!
Maintenance Tips for Longevity
Maintaining your sandals and shoes is essential for keeping them in top shape and ensuring they last through many seasons. You don't want to be that person with worn-out footwear, right? With just a little effort, you can keep your buckles and straps looking great and functioning well. Here are some handy tips for you:
- Inspect your buckles regularly for any signs of wear and tear. Catching issues early can save you from costly repairs later.
- Clean and condition leather straps often. This keeps them flexible and prevents cracking from dryness or harsh weather.
- Store your shoes and sandals in a cool, dry place, away from direct sunlight. This simple step helps avoid material degradation and color fading.
- Avoid excessive force when fastening or unfastening buckles. Gentle handling goes a long way in preventing loosening over time.
Rotating your footwear is another great strategy. Give each pair a rest to recover from wear; trust me, they'll thank you for it! And don't forget about buckle care—keeping them in good shape can really extend the life of your shoes.
Frequently Asked Questions
How to Fix a Loose Strap on Sandals?
Ever wondered how to keep your sandals secure? You can explore strap adjustment techniques like using sturdy string, applying DIY buckle solutions, and employing various sandal repair methods to guarantee a snug fit during wear.
Can You Fix a Buckle on a Shoe?
You can definitely fix a buckle on a shoe. Use buckle replacement tips, apply shoe repair techniques, and follow sandal maintenance advice to guarantee a secure and durable attachment that keeps your footwear functional and stylish.
How Can I Make My Sandals Fit Tighter?
Imagine your sandals hugging your feet like a gentle embrace. You can tighten them with adjustable straps, add sandal inserts for comfort, or explore shoe modifications for a perfect fit that feels custom-made just for you.
How to Tighten Loose Elastic on Shoes?
To tighten loose elastic on shoes, you'll want to explore shoe repair techniques. Utilize elastic adjustment methods, cut and reattach the elastic, and remember these sandal fitting tips for a secure, comfortable fit.