So, your purse has a ripped lining? Don't panic! Start by checking how big the tear is and where it's at. For small rips, grab a needle, thread, and scissors. Just be sure to match the colors. Tie a knot, stitch along the tear, and knot it off—easy peasy! Got a bigger rip? Cut a patch that's at least an inch larger, apply fabric glue, and press it down firmly. Use some binder clips while it dries. Your bag can be back in action but remember, preventing damage is key! Stick around to find out more clever tips!
Assessing the Damage
When tackling a ripped lining in your purse or bag, the first step is to thoroughly evaluate the damage. Grab your purse and inspect it closely. Look at the size and location of the tear. Is it a tiny rip or a big gaping hole? Small tears are usually easier to handle yourself, while larger ones might need some professional help. You don't want to make things worse, right?
Next, take a look around the area of the lining. Are there any other spots that need attention? Evaluating the damage means checking for additional issues, ensuring you've got a full picture of your purse's condition. If you're dealing with a luxury handbag, be extra careful. Improper repairs can really affect its value, and you don't want that!
Now, think about whether you can tackle this project on your own or if you should call in a pro. Some damage is manageable with a few simple techniques, while other issues might need a professional touch. Properly evaluating the damage is essential because it helps you choose the right repair method and materials.
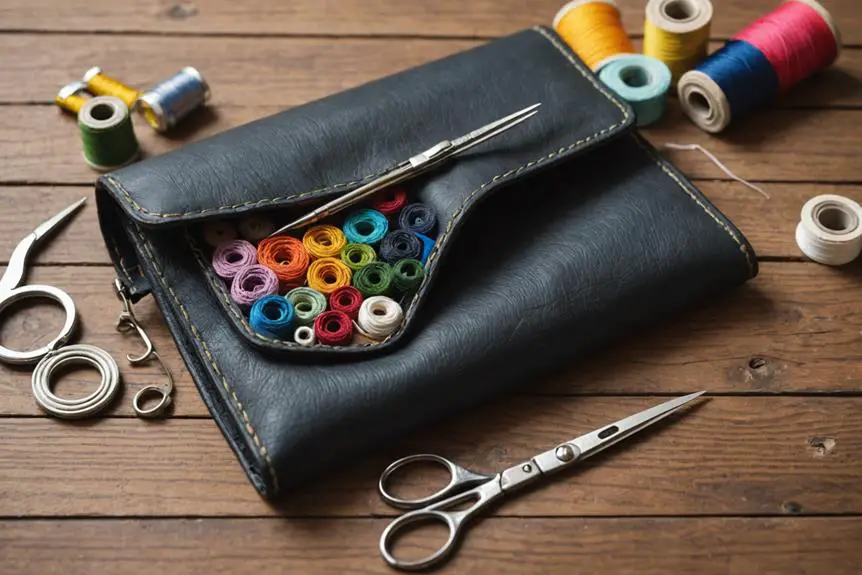
Gathering Necessary Materials
Before you plunge into repairs, gather the necessary materials to guarantee a smooth process. You don't want to scramble halfway through, right? Start with the basics: a needle, matching thread, and scissors. Trust me, you'll need those. If the rip is larger, grab some fabric patches that match the color and texture of your purse's lining. It'll make the repair look seamless, and that's the goal!
Now, don't forget the fabric glue. This stuff is your secret weapon for effective adhesion. It's especially useful for holding those patches in place while you work. You'll also want a seam ripper to carefully remove any old or damaged lining. It's like having a mini excavator for your fabric—very handy!
High-quality fabrics, like ripstop nylon, are great for replacement linings. They're durable and resistant to wear and tear, so your purse will look fabulous for longer. Plus, you might want to keep a measuring tape nearby. This will help you cut accurately, and no one likes uneven edges!
Lastly, gather some binder clips to secure patches while the glue dries. It's a simple trick, but it works wonders. So, are you ready to tackle that ripped lining? With these materials in hand, you're well on your way to making your purse look as good as new! Let's get started on those repairs!
Repairing Small Tears
Small tears in your purse lining can be a nuisance, but fixing them is often simpler than you might think. With just a needle and thread, you can tackle those pesky little rips along the edges and make your purse good as new! Here's a quick guide to help you out:
| Step | Details | Tips |
|---|---|---|
| Gather Your Tools | Needle, thread, scissors | Choose a matching color! |
| Start Stitching | Tie a knot in the thread | Hide the knot behind the lining! |
| Stitch the Tear | Create small, even stitches | Keep them close together! |
| Secure and Trim | Knot the thread at the end | Snip excess for a neat look! |
First, tie a knot in your thread and insert the needle from the backside of the lining. This hides the knot. Next, start stitching along the tear, making sure your stitches are small and even. If your tear is near a seam, reinforce those stitches for extra durability.
When you reach the end, knot the thread securely and trim any leftover bits. Voila! You've just saved your purse from further damage.
Don't forget to regularly check the repaired area for signs of wear. This way, you can catch any issues before they get worse. So, ready to give your purse a little TLC? You've got this!
Patching Larger Damages
Sometimes, small tears just aren't the end of the story. If you've got larger damage in your purse or bag, don't worry! You can totally try to fix it with just a little effort. First, grab some fabric that matches your lining. Cut a patch that's at least 1 cm bigger than the damaged area on all sides. This extra fabric will help cover the tear properly.
Next, apply fabric glue generously along the edges of your patch. Don't skimp! You want to make sure it sticks well. Now, press that patch firmly onto the damaged lining. To really make sure it stays put, use a heavy object or clamps to hold it down while the glue dries. Trust me, this step is essential to avoid any lifting later on!
Once the glue is completely dry, take a moment to inspect your handy work. Look for any loose edges. If you see any, don't panic—just reinforce those areas with a bit of extra stitching. It's like giving your bag a little extra love!
And remember, matching the patch's texture and color to the original lining will keep your purse looking fabulous. So, if you ever find yourself facing larger damages, just follow these steps, and you'll be back to flaunting your favorite bag in no time. Happy repairing!
Preventing Future Damage
Maintaining the integrity of your purse's lining is essential for its longevity. You don't want to be that person with a sad, ripped lining, right? To keep your bag looking fab, regularly inspect it for early signs of wear. Catch those tiny holes before they turn into big problems! Also, try not to overload your purse. Seriously, that extra pair of shoes isn't doing you any favors. Too much weight can stress those seams and lead to tearing.
When you store your purse, use dust bags or pouches. This helps maintain its shape and keeps sharp objects at bay. You wouldn't want your keys poking through, would you? It's also a smart idea to use anti-fray sprays on the edges of seams. These sprays can help prevent fraying and keep those even stitches intact, so your lining stays strong and beautiful.
Consider investing in a sturdy bag insert or organizer. Not only does it provide extra support, but it also keeps your stuff from bouncing around and damaging the lining. Plus, it makes finding your lip gloss a breeze!
Frequently Asked Questions
Can You Reline a Handbag?
Yes, you can reline a handbag. Start by choosing durable lining materials like ripstop nylon or upcycled fabric. Measure carefully, cut to size, and secure everything to guarantee a professional finish that lasts.
How to Restore the Inside of a Purse?
To restore the inside of your purse, assess the damage first. Then, choose lining materials like ripstop nylon or canvas. Finally, replace or patch the lining, ensuring a secure and appealing finish for durability.
How Do You Fix a Ripped Pocket Lining?
To fix a ripped pocket lining, assess the tear's size and location. Use a needle and thread for small rips, or apply a fabric patch with glue for larger damages. Regular maintenance keeps your pocket intact.
How to Fix Luggage Lining?
To fix luggage lining, start by evaluating the damage. Replace it with durable fabric, like ripstop nylon. Secure it with sewing or fabric glue, then maintain your luggage regularly to avoid further issues.


Can you be more specific about the content of your article? After reading it, I still have some doubts. Hope you can help me.
I am curious to find out what blog platform you are working with?
I’m having some small security problems with my latest website and I’d like to find
something more secure. Do you have any suggestions?
Thank you for your sharing. I am worried that I lack creative ideas. It is your article that makes me full of hope. Thank you. But, I have a question, can you help me?