To fix a torn pocket on your jacket, gather sturdy needle, strong thread, scissors, and pins. Assess the damage and fold the pocket edge under for clean sewing. Use a needle threader for convenience, cutting approximately 24 inches of thread. Employ a ladder stitch for an invisible finish, guaranteeing you stitch from the pocket's inside. Reinforce large tears with interfacing if needed, and securely knot the thread to prevent unraveling. Finish the edges neatly and test the pocket with various items to confirm functionality. For further insights into repairs and techniques, you'll find more details beneficial.
Types of Pocket Damage

When evaluating pocket damage on your jacket, it's important to recognize the different types that can occur. The most common issues arise at the inner lining seams, especially where stress is applied during regular use.
Lightweight fabrics like nylon and acetate are frequently used for pocket linings, but these materials are often not strong enough to withstand repeated strain, leading to tears.
You might notice damage manifesting as small rips or holes, particularly at the base seams. These areas are most vulnerable, as they bear the weight of items you carry.
Over time, regular wear can exacerbate existing weaknesses, resulting in more frequent and severe tears.
It's vital to understand the pocket's structure, including the welt and facing, as this knowledge will help you identify the damage more accurately.
By recognizing the types of pocket damage, you can better assess the situation and determine the necessary steps for repair.
Addressing these issues promptly can prevent further deterioration and keep your jacket functional and looking its best.
Essential Repair Materials
Having the right repair materials on hand is essential for effectively fixing a torn pocket on your jacket. Start with a sturdy needle and strong thread, preferably polyester or nylon, as these materials offer durability and flexibility. Avoid using weak threads, as they won't hold up under stress.
You'll also need scissors to trim any frayed edges or excess fabric, ensuring a clean repair. To keep the pocket aligned during stitching, consider using pins or clips. They'll help secure the pocket in place, preventing any shifting while you work.
If the pocket has a hole, assess its size and condition carefully. For a replacement pocket, opt for medium to heavy weight fabric, which will provide the necessary strength and support.
Lastly, while optional, a needle threader can simplify the process of threading your needle, especially with thicker threads. By gathering these essential materials before you begin, you'll set yourself up for a successful repair that not only fixes the pocket but also maintains the jacket's overall appearance, so the inner workings of your repair aren't going to show.
Preparing the Pocket

Evaluating the damage to the pocket is essential before you start the repair process. Determine the extent of the tear to decide on the best approach. If the tear is minor, you might just need to reinforce it. For larger tears, you may need to take additional steps.
Next, carefully fold the pocket edge under to create a clean and even surface for sewing. Make certain to tuck in any frayed edges to avoid further damage. To keep everything aligned during stitching, use pins or clips to hold the folded edge in place.
Keep in mind the following points:
- Accept a minor loss of pocket depth; it might reinforce the area.
- Avoid fixing both sides of the pocket simultaneously to maintain flexibility.
- Check for any additional wear and tear around the pocket.
- Verify you're working in a well-lit area for accuracy.
- Use a fabric that matches the color and texture of your jacket for best results.
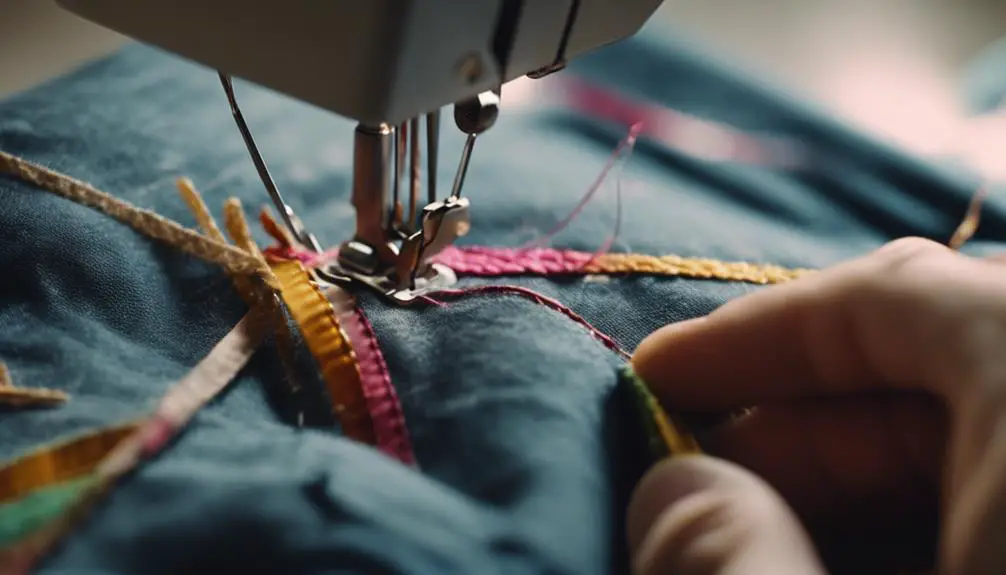
Threading the Needle
To begin threading the needle, cut approximately 24 inches of thread to guarantee you have enough length for your stitching without needing to re-thread frequently. This length allows for smooth movement as you sew, enhancing your overall efficiency. If you're using fine or slippery thread, consider employing a needle threader. This tool can simplify the process and help prevent frustration.
After cutting the thread, create a double knot at the end. This step is vital as it secures the thread and prevents it from pulling through the fabric during your stitching.
When choosing your stitching technique, opt for an invisible stitch, like a ladder stitch, to maintain a professional appearance and minimize visible stitching on the pocket.
Be careful not to cut into the lining of the jacket while threading the needle; doing so can cause additional damage and complicate your repair.
| Step | Description |
|---|---|
| 1 | Cut 24 inches of thread |
| 2 | Use a needle threader if needed |
| 3 | Create a double knot |
| 4 | Avoid cutting into the lining |
Recommended Sewing Technique

Once you've successfully threaded the needle, it's time to focus on the recommended sewing technique for a torn pocket. For a neat, invisible finish, you'll want to use a ladder stitch.
Start by stitching from the inside of the pocket, which helps conceal any visible thread on the outer side. Take small bites of fabric from both sides of the tear, making certain that your thread tension remains consistent to avoid loops. If the tear is large, consider reinforcing the area with interfacing or a patch for added strength.
Here are some key points to keep in mind:
- Use a thread color that matches the pocket fabric for a seamless blend.
- Maintain even spacing between stitches for a tidy appearance.
- Double-check your stitches as you go to make sure they're secure.
- Knot the thread securely inside the pocket to prevent unraveling.
- Tuck away any excess fabric carefully to maintain the pocket's original shape.
Securing the Repair
While securing the repair, it's important to use a strong, durable thread that matches the pocket fabric to guarantee the repair withstands daily use.
Begin by threading your needle with the selected thread, making sure you have enough length to complete the task without frequent re-threading.
Once you've finished stitching, securely knot the thread inside the pocket fabric. This step is significant; a tight knot prevents unravelling and enhances the longevity of your repair.
For added strength, consider reinforcing the repaired area with a small piece of fabric or interfacing on the inside of the pocket. This technique provides extra support, especially if the pocket will endure significant wear.
After sewing, inspect the repaired pocket meticulously. Confirm all edges are neatly finished, checking for any loose threads or gaps that might compromise the repair.
Finally, test the functionality of the pocket by gently inserting items to confirm that the repair holds and that the pocket maintains its shape. This step is crucial to ensure your repair not only looks good but performs effectively in everyday use.
A thorough approach during this stage will lead to a durable and reliable pocket repair.
Finishing Touches

The finishing touches on your pocket repair can greatly enhance both its appearance and durability.
Start by securing the access hole with neat and even stitches to prevent future fraying. This detail not only reinforces the repair but also guarantees that the area remains intact during regular use.
Next, carefully finish all edges of the new pocket. This step is vital for maintaining a clean appearance, and it enhances the pocket's durability.
After that, inspect the functionality of your newly created pocket. Test it with various items to confirm that it can withstand daily use without any issues.
To achieve a professional look, choose a thread color that matches the jacket fabric. This helps hide any knots within the seams, making your repair less visible.
Finally, don't forget to clean up your workspace and tools. Maintaining organization is key for any future sewing projects.
- Use a matching thread color
- Secure the access hole with even stitches
- Finish all edges neatly
- Test pocket functionality with various items
- Clean up your workspace after sewing
Troubleshooting Common Issues
Facing common issues during pocket repairs can be frustrating, but troubleshooting them effectively is key to achieving a successful outcome. Here are some common problems you might encounter and their solutions:
| Issue | Cause | Solution |
|---|---|---|
| Misaligned pocket seams | Improper alignment during sewing | Mark seam lines before stitching |
| Visible stitches on the pocket | Inadequate thread tension | Adjust tension settings on your machine |
| Lightweight fabric tearing | Using an unsuitable fabric | Select medium to heavy-weight fabric |
| Damaging the jacket lining | Poor access to pocket seams | Carefully unstitch only necessary areas |
| Pocket coming undone | Failure to knot thread securely | Double knot thread at the end of repair |
Addressing these issues requires patience and careful attention to detail. Always double-check your work, especially after sewing, to verify everything aligns perfectly. By following these tips, you'll improve your chances of a smooth repair process, resulting in a pocket that looks as good as new.
Enhancing Pocket Durability

To guarantee your jacket pockets withstand daily wear and tear, it's essential to focus on enhancing their durability. Start by selecting medium to heavy weight fabric for new pockets, as it offers better resistance to wear compared to lighter materials. Reinforcing pocket seams with seam binding tape or serging can greatly minimize future ripping or fraying.
Consider implementing these effective strategies:
- Double-stitch or employ a zigzag stitch along the edges of pockets to increase their strength and prevent unraveling.
- Add underlining to the pocket fabric, which provides additional support and helps distribute stress evenly across seams.
- Regularly inspect your pockets for any signs of wear, as early intervention can prevent extensive damage.
- Use high-quality thread for stitching, as this can improve the overall durability of the pocket.
- When patching or repairing, verify that the new fabric matches the original in weight and texture for a seamless finish.
Community Tips and Resources
Often, tapping into community resources can considerably enhance your pocket repair skills. Joining online sewing communities gives you access to a wealth of tutorials and tips tailored for pocket repairs. Websites like Craft Gossip offer articles and links to detailed guides, helping you find specific techniques to fix your torn pockets effectively.
Many sewing blogs foster a collaborative environment where readers share their successes and challenges in garment repairs. Engaging in these discussions not only broadens your knowledge but also connects you with others facing similar issues.
Community forums are particularly beneficial for real-time troubleshooting; experienced sewers can provide immediate advice when you encounter difficulties during your repair process.
Additionally, consider participating in local sewing groups or workshops. These gatherings offer hands-on guidance and allow you to learn from skilled individuals in person.
You'll gain practical experience and confidence in your ability to fix pockets and tackle other garment issues. By leveraging these community resources, you'll not only improve your repair skills but also foster a sense of camaraderie with fellow sewing enthusiasts, making the learning process more enjoyable and enriching.
Frequently Asked Questions
How to Stitch a Torn Pocket?
To stitch a torn pocket, fold the edges neatly, pin them, and use a double knot to secure your thread. Employ an invisible stitch, alternating sides, ensuring consistent tension, then knot securely and hide the thread ends.
How Do You Fix a Tear in a Jacket Without Sewing?
To fix a tear in your jacket without sewing, clean the area first. Then, apply fabric adhesive or use iron-on patches to bond the edges. For small tears, clear nail polish can prevent fraying.
How to Fix a Small Hole in a Jacket?
To fix a small hole in your jacket, clean the area, use matching thread for an invisible stitch, reinforce with fabric behind, secure knots inside, and trim excess thread for a neat, durable repair.
What Is the Best Stitch to Fix a Hole?
To fix a hole, use a ladder stitch for an invisible seam. For durability, a backstitch interlocks threads. Guarantee consistent stitch length and proper tension for a professional finish that seamlessly blends with the fabric.


Uptake efficiency plays a vital role in how well CBD [url=https://www.cornbreadhemp.com/pages/are-cbd-gummies-good-for-sleeping ]Are CBD gummies good for sleeping?[/url] performs in the body. Under-the-tongue tinctures typically deliver cannabidiol into the bloodstream quicker than gummies, which must travel through the digestive tract first. On the other hand, topical applications target localized areas without whole-body absorption. Picking the appropriate delivery mechanism ensures greatest benefit from every drop.