If you've got loose beads or sequins on your dress, don't panic! Start by grabbing a needle, thread, and those pesky embellishments. Use a seam ripper gently to remove any loose ones, and try not to cut the thread—just pull it through! When attaching them back, pinch the thread for stability. Tie off each sequin or bead securely so they stay put. Remember to space them evenly for that polished look. And hey, take breaks to enjoy the process—it's not just about fixing! Stick around, and you'll uncover even more crafty tips to up your sewing game!
Preparation for Beading
To successfully prepare for beading, gather your essential tools: a seam ripper, needle, thread, sequins, and beads. You'll need these to tackle those pesky loose sequins and beads on your dress. First, make sure you've got everything organized. A clutter-free workspace isn't just nice to have; it's a must! You don't want to lose any tiny sequins while you're working, right?
Now, let's talk about that seam ripper. Carefully remove any loose sequins, but watch out! You don't want to cut the thread. If you're not careful, you could make things worse instead of better. As you pull the thread through the loops when removing sequins, make sure to secure it. This way, you'll have a smooth shift when it's time to reattach the sequins.
Speaking of reattaching, organize your sequins and beads so they're easy to grab. You don't want to be digging through a pile of stuff just to find one tiny bead. That'll drive you nuts! Lay everything out in a way that makes sense to you.
And remember, your workspace should be clean. It'll help you focus, and you'll be less likely to misplace anything. So, roll up your sleeves, put on some tunes, and get ready to give your dress the TLC it deserves. You've got this!
Securing the Thread
Now that you've prepped your workspace and gathered your materials, it's time to focus on securing the thread for those loose sequins. You'll want to use the existing thread whenever possible. This helps maintain thread integrity and prevents those shiny little guys from popping off again. Trust me, future you will thank you!
When you're ready to secure the thread, don't cut it just yet. Instead, pull it through the loops. Keeping the thread long not only helps with your current repairs but also allows for easy repair maintenance down the line. Isn't that nifty?
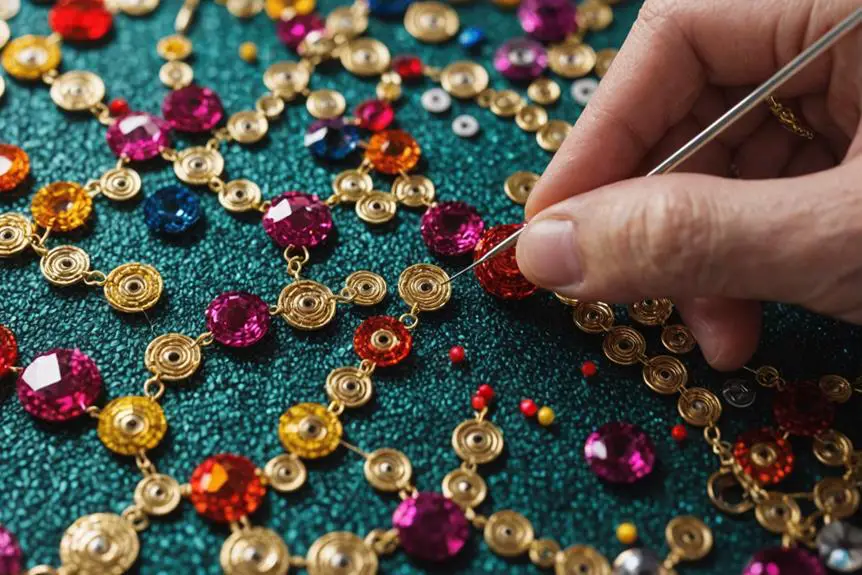
To make things easier, pinch the thread while you're threading the sequins. This little trick helps you pull the thread smoothly and gives you some stability during the attachment process. It's like having a tiny assistant right at your fingertips!
Remember to tie off each sequin securely after you attach it. If you skimp on this step, you risk those sequins becoming loose again over time—yikes! And while you're at it, maintain a steady hand. Nobody wants tangles or knots messing up their fabulous dress!
Attaching Sequins
When it comes to attaching sequins, using a needle with a long thread gives you better control and helps prevent tangling. Trust me, you'll thank yourself later! As you start, think about the sequin types you want to use. Do you prefer shiny metallics or soft pastels? Mixing color combinations can really elevate your dress, so get creative!
Now, position each sequin evenly along the line you're working on. It's all about making sure they're aligned and centered for that fabulous, uniform look. You wouldn't want them dancing all over the place, right? Once you've got them in place, securely tie off each sequin with the existing thread. This step is essential to prevent future wardrobe malfunctions—nobody wants a sequin to go rogue!
If you find yourself dealing with pesky loops, grab a seam ripper. It's a handy tool that'll help you manage those loops and make pulling thread through the sequins a breeze. Just remember to pull the thread gently. You don't want to damage those beautiful sequins or the fabric of your dress.
And hey, if you're feeling a bit overwhelmed, just take a moment to breathe. This process can be fun, especially when you see your embroidery styles come to life! So, roll up those sleeves, get your materials ready, and let's make that dress sparkle like never before!
Techniques for Beading
Beading your dress can transform its look and add a touch of elegance. If you're ready to plunge into the world of beads and sequins, you'll want to grab your beading tools and get started! First, choose the right thread types. You might prefer nylon for its durability or cotton for a classic finish. Trust me, using the right thread can make a huge difference.
As you begin, remember to check your design patterns. Consistent spacing between your beads and sequins is key for a polished appearance. No one wants a lopsided look, right? If you notice any tangled loops, don't panic! A seam ripper can help you manage those pesky threads without damaging your fabric.
When you attach each sequin, make sure to tie it off securely. This way, they won't go bouncing off in the middle of a party! For those areas that see a lot of movement, consider reinforcing your beads with a few extra stitches. It's like giving them a little extra love to keep them in place.
And don't forget about adjusting the folds of your sequins. You want them to lay flat and look fabulous! So, as you bead your dress, take your time, enjoy the process, and let your creativity shine. With these techniques, your dress will be the talk of the town, or at least the talk of your next event! Happy beading!
Final Touches and Tips
After you've mastered the techniques for beading, it's time to put the finishing touches on your dress. First up, do a final arrangement review. Take a good look at your beads and sequins. Are they evenly spaced? Any misalignment? Fix that now to guarantee your dress shines like the star it is!
If you spot any loose beads, don't panic! Simply reinforce them with extra stitches. Trust me, it'll save you from future headaches when they try to escape. Remember, patience is key here. Rushing can lead to mistakes, and we don't want any fabric or embellishment disasters, do we?
Now, while you're at it, think about documenting your techniques. Creating a mini tutorial or jotting down your process can be super helpful for you later—or even for a friend who's keen to learn the art of beading!
Lastly, let's talk about maintaining tools. After all your hard work, you want your tools to be in tip-top shape for next time. Clean and store everything properly. Here's a handy table to guide you through the final touches:
| Task | Description | Tips |
|---|---|---|
| Final Arrangement Review | Check for even spacing and alignment | Use a mirror for a better view! |
| Reinforce Loose Beads | Add extra stitches where needed | Don't be shy, go for a few loops! |
| Document Techniques | Create a tutorial or notes | Snap pics along the way! |
Now, get out there and make that dress fabulous!
Frequently Asked Questions
How to Fix Sequins Falling off a Dress?
To fix sequins falling off your dress, focus on sequin care through proper embellishment techniques. Reinforce attachments, check spacing, and guarantee secure ties during dress maintenance for a polished, long-lasting finish.
How to Stop Beads Falling off a Dress?
To stop beads from falling off your dress, consider bead replacement techniques or fabric adhesive options. Regular dress maintenance tips can also help guarantee your beads stay secure and looking fabulous for longer periods.
How to Fix Sequins on Fabric?
To fix sequins on fabric, try sequin repair techniques like sewing tips for secure attachment or using fabric adhesive options for a quicker solution. Verify everything's aligned and tight to prevent future issues.
How Do You Secure Beading on a Dress?
To secure beading on your dress, consider different bead types and embellishment techniques. Choose appropriate fabric choices, ensuring each bead's securely attached. Reinforce with extra stitches as needed, especially in high-movement areas, for durability.


Thank you for your sharing. I am worried that I lack creative ideas. It is your article that makes me full of hope. Thank you. But, I have a question, can you help me?
Your article helped me a lot, is there any more related content? Thanks!
I don’t think the title of your article matches the content lol. Just kidding, mainly because I had some doubts after reading the article.
Thank you for your sharing. I am worried that I lack creative ideas. It is your article that makes me full of hope. Thank you. But, I have a question, can you help me? https://accounts.binance.info/bg/register-person?ref=V2H9AFPY
Your article helped me a lot, is there any more related content? Thanks!