You don't need to toss your favorite fleece just because it's got a tear. Instead, you can easily repair it yourself with the right techniques and materials. Start by evaluating the damage—understanding whether you're dealing with a small hole or something larger will guide your approach. Many people overlook the importance of maintenance, but that's key to prolonging the lifespan of your winter wear. So, what are the best methods to fix those pesky tears and keep your fleece looking good as new? Let's explore the options available to you.
Understanding Fleece Damage
Fleece is a popular fabric known for its warmth and comfort, but it can easily sustain damage. You might not realize it, but your cozy fleece jacket is sensitive to burns, and those little sparks from a campfire or a stray cigarette can leave unsightly burn holes. If you don't tackle these burn holes quickly, they can grow bigger, making your favorite jacket look worn out and sad. Additionally, the lightweight and soft texture of polar fleece can make it more susceptible to wear and tear, especially during outdoor activities. Remember, understanding polar fleece will help you appreciate its unique qualities and vulnerabilities.
What's worse? Those burn holes aren't just an eyesore; they can also cause functional issues, like letting in cold air when you want to stay warm. So, how can you keep your fleece looking fresh? First, be on the lookout for those pesky burn holes. If you notice any, don't panic! Fabric repair techniques can save the day.
Besides burn holes, fleece can suffer from straight cuts, irregular tears, and larger rips. Each type of damage may require different repair methods, but don't worry, you can handle it! Regular maintenance is key. Give your fleece jacket some love and check for any signs of wear.
Ask yourself, when was the last time you inspected your favorite fleece? By being proactive, you can markedly extend the life and appearance of your fleece items. And who doesn't want to keep their winter wear looking fabulous? So, grab that jacket, inspect it, and let's get started on some repairs!
Repairing Small Holes
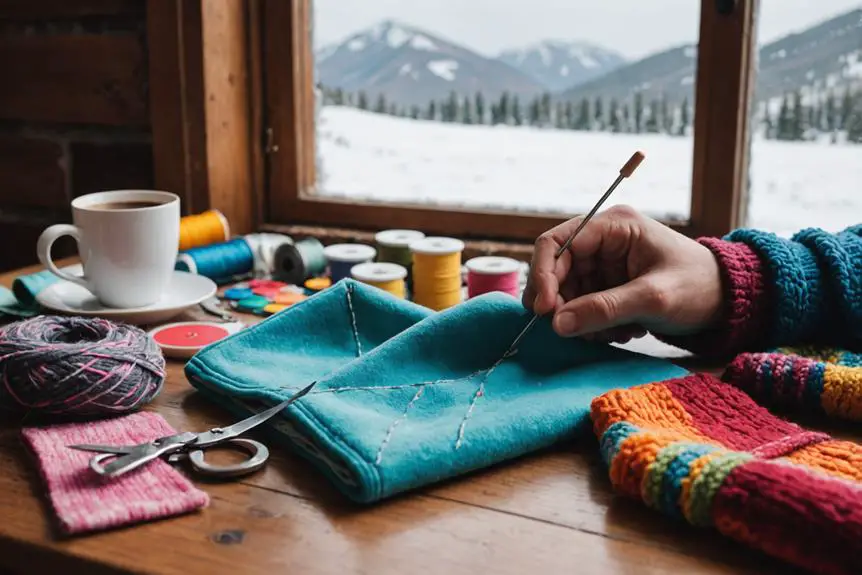
Got a small hole in your favorite fleece? No worries! With some fabric glue, a pair of scissors, and a little trick of turning the garment inside out, you can have that hole fixed up in no time—just make sure to let it dry before you rock it again!
Fabric Glue Application
Repairing small holes in fleece can be a straightforward task with the right approach, and fabric glue is an effective solution that eliminates the need for sewing. You'll love how easy it is! First, make sure to trim any singed or frayed fibers around the hole for a clean repair. Then, turn your fleece garment inside out; this way, the repair won't be as visible on the outer side.
Here's a quick guide to help you out:
| Step | Action | Tip |
|---|---|---|
| 1 | Trim the area around the hole | Use sharp scissors for neatness |
| 2 | Apply fabric glue to the hole | A little goes a long way! |
| 3 | Press the fabric together | Make sure it sticks well! |
| 4 | Let it dry completely | Follow the glue's instructions |
| 5 | Turn it right-side out | Now it looks good as the day! |
After you've done this, you'll be amazed at how the fabric glue keeps your fleece looking fabulous! Just remember, if fabric glue isn't on hand, non-solvent superglue can work temporarily, but it won't be as durable. Happy repairing!
Scissors for Singed Fibers
When dealing with small holes in fleece, carefully trimming away any singed or burnt fibers around the edges is essential. If you've got a little bit of a hole, you'll want to grab some sharp scissors and gently snip those singed bits. Don't go overboard, though! You're aiming to keep as much of that brand new fleece intact as possible, so just focus on the singed parts.
Once you've made those cuts, it's time to make your repair process even smoother. Turn your fleece inside out—trust me, this helps keep your work looking neat and tidy. Now, when you're ready to fix that hole, make sure the edges are nicely matched up. This will help your repair blend in better and make it less noticeable.
And remember, after you apply your fabric glue, give it plenty of time to dry before you wear your fleece again. You want that repair to hold up so you can rock your favorite winter wear without worry. Who knew fixing fleece could be this simple and fun? Happy repairing!
Inside-Out Repair Technique
Turning your fleece garment inside out simplifies the repair process for small holes, allowing you better access to the damaged area. This inside-out advantage not only makes it easier to see what you're fixing, but it also helps keep the repair looking neat—important for fleece care!
Here's how to tackle those pesky holes:
- Trim any singed fibers: Grab your scissors and carefully snip away any frayed edges.
- Apply fabric glue: Use a good fabric glue, and apply it directly to the edges of the hole. Make sure to follow the manufacturer's instructions for drying time. This step is key for repair aesthetics!
- Consider sewing: If you're more of a sewing person, grab some color-matched thread. Carefully align the fabric edges before stitching them together for a cleaner look.
In emergencies, non-solvent superglue can work, but remember, it's not as flexible as fabric glue. So, if you want your fleece to stay comfy, stick with fabric glue when you can! Happy repairing!
Fixing Large Holes
Got a big hole in your fleece? Don't worry, fixing it isn't as scary as it sounds! With just a needle, some darning yarn, and maybe a coffee cup, you can weave your way to a sturdy repair that'll keep your favorite cozy item in action.
Tools for Darning Holes
Fixing large holes in fleece requires the right tools to guarantee a successful repair. You don't want to plunge into this without being prepared, right? Here are three essential items you'll need:
- Darning needle – A sturdy needle makes all the difference when you're stitching up those holes.
- Darning mushroom (or a coffee cup/can) – This handy tool gives you a solid surface to work on. It helps you weave the yarn in all directions, making sure your repair holds up.
- Darning yarn – Pick a yarn that closely matches your fleece. This is key for keeping your repair aesthetics on point.
Using proper darning techniques, like crisscross stitching, will help secure those edges while reinforcing the fabric's integrity. Sure, darning can be a bit time-consuming, but think of it as a relaxing project. Why not catch up on your favorite show while you work? With the right tools and a little patience, you'll be amazed at how seamlessly you can fix those large holes. So grab your supplies, and let's get darning! Your fleece will thank you.
Weaving Techniques Explained
Often, weaving techniques for repairing large holes in fleece can seem intimidating, but they're quite straightforward once you get the hang of it. First, gather your tools: a needle, a darning mushroom (or a coffee cup if you're feeling crafty), and darning yarn that matches your fleece color. Trust me, yarn color choices can make or break your repair!
Start by aligning the edges of the hole. Position the darning mushroom underneath for support, making it easier to work your magic. Now, here's where the fun begins: use creative stitching methods like a zig-zag stitch. This technique reinforces those irregular edges and helps prevent fraying. It's like giving your fleece a cozy hug!
As you weave, remember that repairing different fabrics might require adjustments, so don't be afraid to experiment. Maybe try a few different patterns, and see what works best! Sure, this can be a little time-consuming, but why not pair it with your favorite show or some tunes? It'll make the process feel less like a chore and more like a fun little project. So, roll up those sleeves and get ready to make your fleece as good as new!
Time-Consuming Repair Process
Repairing large holes in fleece can take some time, but the results are worth the effort. Trust me, once you see that cozy fabric back in action, you'll be glad you put in the work! To tackle this, you'll want to master a few key darning techniques. Here's what you'll need:
- A needle and matching darning yarn.
- A darning mushroom (or a coffee cup/can if you're feeling crafty).
- Patience—this repair time can be a bit lengthy!
Start by aligning the fabric edges, making sure everything's snug. Then, weave the yarn through the hole in a crisscross pattern. It might feel tedious, but it's super effective for durability. While you're at it, why not pair this task with a favorite show or some tunes? It makes the process fly by!
Once you finish darning, take a moment to inspect your work. Does it look strong and appealing? If so, your fleece is ready for action again! Just remember, a little effort goes a long way in keeping your winter wear cozy and functional. Happy repairing!
Addressing Very Large Holes
When you discover a very large hole in your fleece, using fabric repair patches can provide a durable solution. These patches come in both sewn-on and iron-on types, so you can choose what works best for you. When it comes to patch selection strategies, think about the size and shape of the hole. You want a patch that covers the damage completely while blending in nicely with your fleece.
Now, let's explore some patch application tips! If you're using an iron-on patch, remember to set your iron to the lowest setting. You definitely don't want to fry your fleece! Plus, placing a cotton cloth between the patch and the iron will protect it even more. And hey, when you're applying the patch, avoid pressing down too hard. You want to keep that soft pile intact, right?
After you stick on that patch, keep an eye on it. Regularly inspect your patched areas to catch any signs of unraveling or tearing. This is a key factor in patch longevity; the sooner you address any issues, the longer your fleece will last.
Maintenance Tips for Fleece
Taking care of your fleece can greatly extend its life and keep it looking great. Trust me, a little fleece care goes a long way! You don't want your favorite jacket to end up looking like a worn-out mop, right? Regular care, similar to how you would treat vintage corduroy pants, is essential for maintaining texture and appearance. Follow these simple washing guidelines and storage tips to keep your fleece in tip-top shape:
- Wash with Care: Always wash your fleece jackets in cold water on a gentle cycle. This prevents fabric damage and cuts down on pilling, which can make your fleece look old before its time. Don't skip the care instructions; they know what they're talking about! As with corduroy, it's important to wash similar colors together to avoid unwanted dye transfer and use a mild detergent to preserve your fabric's quality.
- Skip the Dryer: Seriously, avoid using tumble dryers. High heat can shrink your fleece and lead to even more wear. Instead, air dry your fleece flat or hang it up. Your fleece will appreciate the break from the heat!
- Store Smart: When the winter chill is gone, store your fleece in a cool, dry place, away from direct sunlight and moisture. This prevents mold and keeps the fabric from degrading. You want that cozy feel when winter rolls around again!
Remember to regularly inspect your fleece for wear, like pesky pilling or small tears. Catching issues early can save you from bigger problems down the line. If you notice any rips, tackle them promptly! Your fleece deserves the best, and with these tips, it can stay looking fresh and fabulous for many winters to come!
Professional Repair Options
If you've got a tear in your beloved fleece, don't fret—there are professional repair options that can bring it back to life. Services like Rainy Pass Repairs specialize in fixing outdoor gear, and they usually start their fees around $16. Now, that's not too bad for saving your favorite winter wear! Proper care of your fleece, including the importance of washing vintage clothing, can also help maintain its longevity and appearance.
One of the best parts about going pro is the service quality. These experts provide high-quality craftsmanship, ensuring your fleece is just as durable and functional as before. Plus, if your gear is from Patagonia, you might even score some free repairs depending on your warranty! Talk about a sweet deal!
You might be wondering about the turnaround time. Most of these repair services are pretty quick, so you won't have to wait forever to snuggle back into your cozy fleece. It's also a major time-saver compared to DIY methods, which can sometimes lead to more headaches than solutions.
And here's a bonus: many services offer warranties on their repairs. This gives you peace of mind about the longevity and quality of the work done. So, why take on the hassle of fixing it yourself when you can let the pros handle it? Enjoy your winter wear without the worry! After all, fleece is meant for warmth and comfort, not stress and sewing kits. So go ahead, give those professionals a call, and get ready to flaunt your fleece again!
Frequently Asked Questions
How to Repair a Tear in Fleece?
To repair a tear in fleece, you can use fleece patching techniques, try needle felting methods for small holes, or apply fabric adhesive options for quick fixes. Choose the method that best suits your tear's size and type.
Can You Fix Pilled Fleece?
You can fix pilled fleece by using lint removers or fabric shavers. For effective fleece care, focus on pilling prevention through gentle washing and regular fabric maintenance, ensuring your fleece stays looking fresh and new longer.
How to Restore Fleece Fabric?
Reviving your fleece feels like breathing new life into a cherished winter hug. Embrace fleece care by regularly removing pilling and using fabric shavers. Prioritize fabric maintenance to keep your winter wardrobe cozy and vibrant.
How to Revive Polar Fleece?
To revive polar fleece in your winter wardrobe, focus on fleece care. Use a lint remover for pilling, wash it in cold water without fabric softeners, and store it properly to guarantee ideal fabric maintenance.


One Comment