When you find yourself faced with torn lace on a delicate garment, it's essential to approach the repair with care and precision. You'll want to assess the damage and gather your materials, ensuring everything is suitable for fine fabrics. Aligning the torn edges might seem straightforward, but the real challenge lies in choosing the right technique to restore the lace without compromising its integrity. As you consider your options, think about how the choice you make could affect the overall look and longevity of the piece. What methods will truly help you achieve the best results?
Understanding Lace Fabric
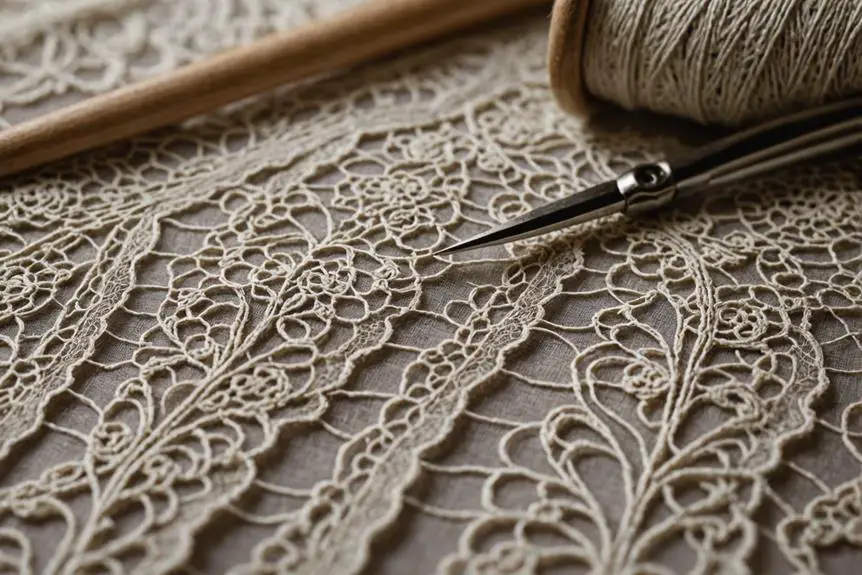
When you think about lace fabric, you might envision its intricate designs and delicate patterns that have been cherished for centuries. Lace isn't just a pretty face; it's a unique textile that adds flair to your favorite garments. You'll find lace in everything from elegant bridal gowns to chic evening wear, making it a go-to choice for special occasions. That sheer or semi-transparent quality? It lets light dance through, creating a sophisticated look that's hard to resist!
Lace can be crafted from various fibers, like cotton, silk, polyester, and nylon, much like how identifying high-quality textiles can enhance your wardrobe choices. Each type of lace fabric has its own texture and durability, which means you can choose what feels right for your outfit or décor. Whether you're draping a lace tablecloth for a dinner party or slipping into a lace-trimmed dress, it combines beauty with functionality, enhancing your style effortlessly.
But what happens when that beautiful lace gets damaged? Don't worry; you can still repair lace! Understanding the intricacies of lace fabric will help you tackle any repairs with confidence. It's all about knowing how it's made and what materials are involved. With the right techniques and a little patience, you can breathe new life into your favorite lace pieces. So, the next time you admire a lovely lace garment, remember, you're not just looking at a fabric; you're appreciating a timeless art form that deserves a second chance!
Common Causes of Damage
Lace can easily fall victim to various forms of damage, often due to factors you might not immediately consider. Ever snagged your favorite lace top on a zipper or a piece of jewelry? That's a classic example of one of the common causes of damage. Sharp objects can catch on delicate threads, leading to those heartbreaking rips. Additionally, pilling prevention techniques highlight the importance of handling delicate fabrics with care to avoid such issues.
Then there's the wear and tear that happens when you're just living your life. Continuous friction from rough surfaces like furniture or even other rough clothing can weaken those delicate fibers. It's like taking a fine piece of art and rubbing it against sandpaper—yikes! Improper handling, like pulling or stretching your lace too much, can also lead to damaged threads.
Washing and drying methods matter, too. Using hot water or tossing your lace in the dryer is like sending it on a one-way trip to the damage zone. Instead, treat your lace garments like the royalty they are! And let's not forget aging and environmental factors. Exposure to sunlight and humidity can gradually weaken lace, making it more vulnerable.
Essential Repair Materials
When it comes to fixing torn lace, having the right tools is a game-changer! You'll need a fine sewing needle, matching thread, and maybe even some fabric glue for those quick fixes. Plus, sharp scissors and pins can make your repair process smoother—who doesn't love a tidy job?
Recommended Sewing Tools
To successfully repair torn lace on delicate garments, you'll need a few essential sewing tools that can make the process easier and more effective. First up is a fine sewing needle, specifically designed for delicate fabrics. This helps avoid any further damage while you're working your magic. Don't forget to grab some sharp pins! They're vital for holding the lace in place during repairs, ensuring everything aligns perfectly for a neat finish.
Next, you'll want matching thread in color and type to blend seamlessly with the lace fabric. For minor tears, fabric glue can be a quick fix, but it shouldn't replace thorough sewing methods. Finally, small, sharp scissors are a must-have for making precise cuts and trimming excess thread after you've sewn everything back together.
Here's a handy table of your recommended tools:
| Tool | Purpose |
|---|---|
| Fine Sewing Needle | Prevents damage to delicate fabric |
| Sharp Pins | Holds lace in place during repairs |
| Matching Thread | Blends with original design |
| Small, Sharp Scissors | For precise cuts and trims |
With these tools in hand, you're ready to tackle those lace repairs!
Fabric Adhesives Options
Repairing delicate lace can be much easier with the right fabric adhesives at your disposal. Instead of wrestling with needle and thread, you can use fabric glue or specialized lace repair glue to bond those torn edges quickly. Isn't that a relief? When picking an adhesive, look for options that dry clear and stay flexible. You want your lace repair to blend seamlessly, right?
Always check the manufacturer's instructions for application and drying times. Trust me, following those steps can save you from a sticky situation later. If you're dealing with a bigger tear, don't worry! You can combine fabric glue with some reinforcement techniques, like fusible interfacing. This gives your repair a little extra strength, so your lace stays intact.
Before diving into your repair, test the adhesive on a small, hidden part of the lace. You wouldn't want it to discolor or damage the fabric, would you? With these tips in hand, you'll be well on your way to mastering lace repair like a pro! So, grab that glue and let's get fixing!
Step-by-Step Repair Techniques
Ready to tackle that torn lace? Let's break down two simple but effective methods: hand stitching and gluing. Whether you're a sewing whiz or just looking for a quick fix, I've got you covered with techniques that'll have your delicate garment looking fabulous again in no time!
Hand Stitching Method
Align the torn edges of your lace fabric carefully and secure them with pins for a precise match before you start stitching. This step's essential—no one wants a lopsided repair! Grab a fine needle and matching thread, then start your magic. Make small, even stitches that mimic the original lace pattern. It's like giving your lace a little makeover! Don't forget to knot the thread securely on the underside after each stitch; we want this beauty to last.
For extra stability, consider placing a piece of cardboard behind the tear. It'll help you see what you're doing and keep everything in place. Once you're done stitching, gently press the repaired area with a low-heat iron. This smooths out any wrinkles and makes sure it lays flat.
Keep an eye on your repair afterward. Is there any wear? If so, reinforce it with a few more stitches. After all, repairing lace is an art, and you're the artist! Isn't it satisfying to see your delicate garment restored? So, roll up those sleeves, and let's get stitching! Your lace deserves it!
Gluing Technique Overview
When dealing with torn lace on delicate garments, a gluing technique can be a quick and effective solution. First things first—clean the torn area and get those edges aligned. You don't want dirt messing up that adhesive magic! Next, grab some high-quality fabric glue. Apply a thin, even layer along the torn edges. Remember, less is more here; saturating the lace could lead to stiffness, and nobody wants that!
Now, carefully press those edges together, making sure they're aligned perfectly. This step's super important for keeping your lace's original pattern intact. Hold the fabric in place according to the glue's instructions, typically for a few minutes, until it starts to set. It might feel like forever, but hang in there!
Once it's dry, trim any excess glue or stray threads to finish up nicely. Just be careful not to cut the lace itself—no one wants to make things worse! And there you have it, a simple gluing technique that can save your favorite garment. So, are you ready to tackle that lace repair process? You've got this!
Preventing Future Damage
To keep your lace garments looking pristine, it's essential to take preventive measures against potential damage. You don't want to end up with tears and snags that could ruin your favorite pieces, right? First things first: try to avoid wearing lace in places where rough surfaces or sharp objects lurk. Think about it—those sneaky edges are just waiting to catch your delicate fibers! Additionally, consider treating your lace with a high-quality stain-resistant spray, similar to the approach taken with suede care, to enhance its longevity.
When dressing or undressing, handle your lace with care. A little tugging can lead to irreversible damage, and we definitely don't want that. Plus, always remove your jewelry before slipping on or off your lace garments. Those sharp edges are like tiny ninjas, ready to snag your lace at any moment!
Now, let's talk laundry. When it's time to wash your lace, stick to hand washing in cold water with a gentle detergent. It's a simple repair method to protect those delicate fibers. And whatever you do, avoid wringing or twisting; that's a sure way to ruin your lace.
Lastly, how you store your lace matters, too! Keep it flat or use padded hangers in a cool, dry spot, away from sunlight. This keeps your garments in shape and prevents discoloration or deterioration over time. By following these tips, you're not just preventing future damage—you're ensuring your lace stays beautiful for years to come! So go ahead, rock that lace with confidence!
Community Tips and Support
If you ever find yourself struggling with torn lace, connecting with online communities can be a game changer. You'll find a treasure trove of tips and personal stories that can help you tackle those delicate repairs. Many folks share their success stories, and trust me, nothing boosts your confidence like hearing how someone else turned a lace disaster into a quick fix!
Here's a little table to spark some ideas and connect you with the community's wisdom:
| Platform | Tips Shared | Why It's Helpful |
|---|---|---|
| Vintage Fashion Forum | Repair techniques and product recs | Learn new methods for effective fixes! |
| Instagram Groups | Before and after repair pics | Inspiration galore—see what's possible! |
| Facebook Pages | Personal repair stories | Boosts your confidence through relatable experiences! |
| Pinterest Boards | Visual tutorials | Step-by-step guides make it easy! |
| Reddit Threads | Q&A with fashion enthusiasts | Get tailored advice just for you! |
Frequently Asked Questions
Can You Repair Ripped Lace?
Absolutely, you can repair ripped lace! With lace patching techniques and lace embroidery methods, you'll weave beauty back into your fabric. Just gather your tools, and let your creativity mend the delicate threads.
How Do You Repair a Tear in Delicate Fabric?
To repair a tear in delicate fabric, you'll want to use delicate stitching techniques. Consider lace patching for larger tears, ensuring the fabric remains intact while blending seamlessly with the surrounding material.
How Do You Clean Fragile Lace?
To clean fragile lace, you should use gentle washing techniques. Hand wash delicate lace types in cold water with mild detergent, avoiding twisting. Air dry away from sunlight to preserve the fabric's integrity and color.
Does Stretch Lace Fray?
Imagine wearing a beautiful dress with stretch lace. You notice the edges fraying after a few washes. Yes, stretch lace can fray, so regular lace maintenance, like gentle handling, is essential for preserving its beauty.


One Comment