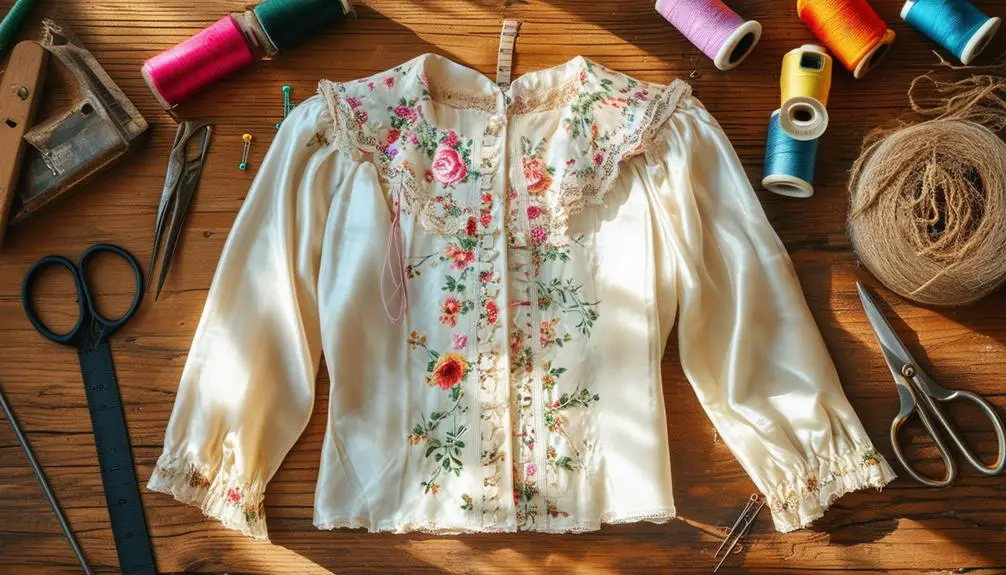
To tailor a vintage silk blouse, start by washing and ironing it for a clean surface. Turn it inside out and take your measurements. Pin side seams and adjust darts to guarantee a flattering fit while maintaining the blouse's shape. Carefully cut any excess fabric and use a serger to finish edges and prevent fraying. Hem the bottom by folding it up, securing with pins, and sewing with a straight stitch. Finally, try on the blouse frequently to make small adjustments and check for comfort. With these tips, you'll uncover even more techniques to enhance your vintage finds.
Purpose of Upcycling

Upcycling serves as a creative lifeline for vintage clothing, breathing new life into thrifted or unused pieces while championing sustainability. By transforming garments that might otherwise end up in landfills, you actively participate in reducing waste and promoting a more eco-friendly fashion industry.
Understanding the significance of vintage clothing labels can enhance your upcycling journey, as these tags often tell a story of the garment's history. The purpose of upcycling isn't just about saving the environment; it's also about expressing your unique style. You can personalize each piece, retaining its original charm while tailoring it to match your tastes.
Engaging in upcycling offers a practical benefit too. It saves you money while supporting local thrift shops, helping keep them afloat in a world dominated by fast fashion.
Plus, initiatives like Upcycling September challenge you to create 30 upcycled pieces in 30 days, fostering creativity and resourcefulness. You connect with a community of like-minded individuals passionate about sustainable fashion by sharing your projects on social media. Hashtags like #upcyclingseptember make it easy to find inspiration and share your creations.
Ultimately, the purpose of upcycling goes beyond just fashion; it's a movement towards conscious consumerism, where every stitch you make contributes to a healthier planet.
Preparing the Blouse
Preparing your vintage silk blouse for upcycling involves careful attention to detail and a few vital steps. First, turn the blouse inside out before placing it on a dress form. This guarantees accurate fitting adjustments while protecting the delicate fabric from damage.
Next, grab a ruler and measure down an inch from the waistline to determine your cutting point—this keeps the proportions intact.
Make certain you gather your vital tailoring tools: a ruler, scissors, serger, and sewing machine. Having these on hand will facilitate a smooth and efficient upcycling process.
Once you've set everything up, pin the side seams of the blouse to guarantee balance during tailoring. This step is essential for identifying princess lines, which help you place darts accurately and enhance the overall fit.
Measuring for Adjustments

Measuring for adjustments is an important step in transforming your vintage silk blouse into a perfectly fitted piece. Start by turning the blouse inside out. This way, you can accurately assess and mark areas needing adjustments without distorting the delicate fabric.
Grab your measuring tape and take key measurements: bust, waist, and hip. Be sure to measure at the fullest points to guarantee a precise fit. Understanding the identifying vintage characteristics of your blouse can also help in making the right adjustments, as unique design elements may require special attention.
Next, identify the waistline by measuring down an inch from your natural waist and marking it with tailor's chalk for clarity. This will help guide you during the adjustment process.
To get an even better idea of how the blouse fits, pin the side seams while it's on a dress form, allowing you to gauge necessary adjustments while maintaining balance throughout the garment.
Before you proceed with cutting or sewing, always double-check your measurements and adjustments. This final verification is vital to guarantee the tailored fit meets your expectations.
Dart Placement Techniques
With your adjustments in place, it's time to focus on dart placement techniques that will enhance the fit of your vintage silk blouse. Start by pinning the center front points and marking alignment with chalk. This step guarantees symmetry, vital for a polished look.
As you work on your blouse, consider the history of fashion brands that have influenced vintage styles, such as Betty Barclay and Beverly Hills Polo Club.
Next, when creating darts, adjust the angle based on how the fabric lays. This flexibility allows you to achieve a smooth, flattering silhouette without any distortion. Measuring and marking your dart lines accurately is essential—confirm they're evenly spaced at the bust and back for a cohesive appearance.
To sew the darts, align the fabric right sides together, carefully following the chalk lines you've drawn. Backstitching at both ends secures the seams, preventing them from unraveling.
Once sewn, gently blend the dart tips into the fabric to avoid bulkiness, giving the inside of the darts a clean finish.
These dart placement techniques not only improve the fit but also enhance the overall aesthetic of your vintage silk blouse, guaranteeing you look stunning in your tailored creation.
Cutting and Serging

Your vintage silk blouse deserves precise cutting and finishing to achieve that perfect tailored look. Start by measuring carefully to determine your desired cropped length. A single mistake can compromise the garment's integrity, so take your time. Once you've marked your cutting line, grab your fabric scissors and cut along the line smoothly.
Next comes the essential step of serging. Using a serger, finish the bottom edge of the blouse to prevent fraying and maintain its exquisite quality. Verify the blade is aligned correctly to achieve a clean edge without cutting off too much fabric.
Here's a quick reference table to guide you through cutting and serging:
| Step | Tips |
|---|---|
| Cutting | Measure accurately to avoid mistakes. |
| Serging | Align the blade for a clean edge. |
| Folding the Hem | Fold up half an inch, secure with pins. |
| Sewing the Hem | Use a straight stitch and backstitch. |
After serging, fold the hem up and pin it into place for a neat finish before sewing. With careful cutting and serging, your blouse will exude elegance!
Hemming for Finish
After securing the hem with pins, it's time to focus on hemming for a polished finish. This vital step will elevate your vintage silk blouse, guaranteeing it looks professionally tailored. Here's how to achieve that clean edge:
- Serge the Bottom Edge: Before anything else, serging prevents the delicate silk from fraying. It's essential since silk can unravel quickly.
- Fold Up the Hem: Fold the hem up by half an inch, making sure that the fold is even all around. Pin it securely to keep it in place.
- Stitch with Care: Use a straight stitch to complete the hem, adjusting the stitch length for silk's lightweight nature. A delicate finish is what you'd love to achieve.
- Press for Perfection: Finally, press the hem with a low heat setting on your iron, using a pressing cloth to protect the fabric. This creates a crisp edge without damaging your beautiful silk.
Before finalizing, try on the blouse with high-waisted items to see how it complements your look.
This attention to detail will guarantee your blouse has that polished finish you desire!
Final Fit Adjustments

Once you've completed the initial adjustments, slipping the blouse on for a final fitting is essential to verify it aligns perfectly with your body. Start by checking the shoulder seams; they should rest comfortably without slipping or pinching. Adjust if necessary to achieve that tailored look.
Next, turn your attention to the side seams. Confirm both sides are balanced; if one side feels looser or tighter, re-pin and sew accordingly for symmetry. Don't overlook the armholes—make sure they aren't too tight or loose. You might need to adjust the sleeve cap for a smooth fit.
Lastly, evaluate the neckline. It should sit flat against your skin without gaping. Tweak the darts or seams if you notice any inconsistencies.
| Adjustment Area | Key Action |
|---|---|
| Shoulder Seams | Ensure comfort |
| Side Seams | Check for balance |
| Armholes | Adjust sleeve cap |
| Neckline | Confirm it lays flat |
| Overall Fit | Look for pulling or sagging |
With these adjustments, your vintage silk blouse will fit like a dream!
Frequently Asked Questions
Can a Silk Blouse Be Tailored?
Yes, you can tailor a silk blouse, but you need to handle it carefully. Use sharp scissors and a serger to finish edges, ensuring you maintain its elegance while making necessary adjustments for a better fit.
How Hard Is It to Tailor Silk?
Tailoring silk can be quite challenging. You'll need to handle it delicately, using proper stitching techniques and tools to avoid fraying. With patience and precision, though, you can achieve stunning results that enhance your garment.
How Do You Clean a Vintage Silk Blouse?
To clean your vintage silk blouse, gently hand wash it in cold water using a delicate detergent. Avoid soaking for too long, and air dry it flat away from sunlight to preserve its beauty.
Can Satin Shirts Be Tailored?
Absolutely, you can tailor satin shirts! Just handle the fabric with care, using sharp tools. Adjust darts and seams to enhance the fit, and remember to try it on frequently for best results.


2 Comments